Streamlining Spring Irrigation Startup
As a grounds manager, there are a number of important steps you should follow every time you need to fill an empty irrigation system — whether you are doing it after a winterization in the fall, to pressurize a new system, or any other time your system has been depressurized, such as after repairing a line break.
To accomplish irrigation system pressurization safely and efficiently, your technicians will need to rely on their instincts, exercise common sense, remain alert throughout the entire pressurization process and practice good communication with the other technicians.
Important Considerations
Perhaps the most logical step in successfully starting up a sprinkler happens long before you ever connect the water source to the system in the spring. The best way to ensure that a springtime startup will go smoothly is by making sure fall winterization procedures have been done correctly and completely. This includes making sure there’s no damage to the electrical components, draining all of the water from the system, and actuating or manually bleeding the water from anything that is connected to the source, including valves, solenoids, breakers or actuators.
Being proactive in the fall during the winterization process not only helps protect the integrity of the irrigation system once it is started up again, but also helps your team manage their workload in a more effective way, as many of us experience an increased workload and a sense of urgency to get the irrigation system up and running at the first sign of a warm-up. This is in addition to all of the other springtime tasks your crews need to be thinking about, like seeding, removing winter debris, dethatching, fertilizing and controlling weeds. As for the irrigation system, anything that wasn’t properly maintained in the fall will need to be addressed in the spring, when time is at a premium. In short, as long as the system was properly maintained and put to bed in the fall, springtime startup can be a quick and painless job.
Step-by-Step Planning
Once you are confident that your system is ready to be activated, developing a startup process and communicating this process with the rest of your team is key. Each irrigation system is different and may require adjustments to the process, but most commercial irrigation systems can be ready to go in five simple steps:
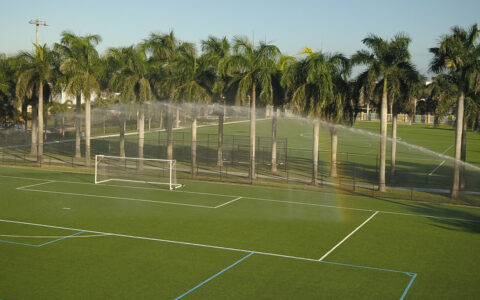
- Vent piping system before filling. Open drain valves in low areas of the system. At all high points and dead ends, technicians should manually turn sprinklers to the “ON” position and insert quick coupler keys in QCVs. This will allow air to bleed from the system during the filling process. Crews should avoid compressing air and relieving, but should instead bleed air from the lines while filling the system.
- Adjust pressure regulation at the source. Keep the pressure below 50 pounds per square inch (psi) to minimize injury to team members and damage to the system itself. Technicians should supply water to the system at a velocity fill rate of less than two feet per second.
- Filling the piping system. Starting closest to the source, monitor open drains, sprinklers and quick couplers. When steady water flow is detected, technicians should close low-elevation drains and quick couplers, turn sprinklers off and move to the next highest location. Repeat until air is completely evacuated and all venting locations have been closed.
- Activate each sprinkler electronically. While maintaining a maximum pressure of less than 50 psi, turn on sprinklers electrically to allow any remaining air to escape. During this phase, technicians will want to identify any system component issues and make repairs as necessary.
- Confirm all air has been removed. Once this is complete, adjust the system pressure to the normal operating pressure.
Common Sense and Awareness
A healthy dose of common sense goes a long way when opening up an irrigation system for the season. The system is being put under a lot of pressure after lying dormant for several months, so technicians should take great care to inspect heads for any cracking or abnormalities before the filling process begins. Pressurizing a damaged head can cause it to disconnect from the irrigation system with considerable force, potentially causing harm to the system, and more importantly, posing a potential risk to technicians and crew members. During pressurization, you and your technicians will want to make sure that all team members are at a safe distance from the heads to avoid personal injury. Using personal protective equipment (PPE), like gloves and safety glasses, is also recommended. Any time an object is pressurized over 35 psi, it could potentially cause injury, so making sure team members are mitigating their risk while working through startup tasks is key.
During the pressurization process, technicians will also want to remain extremely aware of their surroundings and pay close attention to what’s going on with the system every step of the way. A technician’s eyes and ears are the most important tools they have, as they will need to constantly monitor and identify any abnormalities they see or hear while filling the system. Whether your operation’s irrigation system is supplied by a municipal water source or by surface or groundwater through a pumping system, listening carefully is extremely important. Often, inconsistencies in the pump’s operation are an early indicator that there may be something the crew needs to address with the irrigation system. Throughout the pressurization process, a team member should always be monitoring the functionality of the pump and be ready to communicate any odd noises to the rest of the team.
A Simple and Swift Startup
With the right formula, irrigation system startups can be quick and easy. Properly winterizing the system the previous fall, developing and working a plan, using common sense, capitalizing on the experience of seasoned technicians and being aware of one’s surroundings will help to ensure the springtime irrigation system startup goes off without a hitch.